This post is about doing a lab for flood and learn VxLAN deployment, Here the topology I am going to use in EVE-NG PRO

Steps
- Basic IP address configuration
- OSPF as Underlay
- PIM as Underlay (multicast)
- VxLAN configuration
—————————————————
Step1 -Basic IP address configuration
————-SPINE1—————————-
config t
host SPINE1
interface e1/1
no sw
ip add 10.1.30.1/30
no shut
interface e1/2
no sw
ip add 10.1.100.1/30
no shut
interface e1/3
no sw
ip add 10.1.101.1/30
no shut
int lo 0
ip add 100.100.100.100/32
no shut
end
copy run start
————-VTEP1—————-
config t
host VTEP1
interface e1/2
no sw
ip add 10.1.100.2/30
no shut
int lo 0
ip add 1.1.1.1/32
no shut
end
copy run start
————-VTEP2——————
config t
host VTEP2
interface e1/3
no sw
ip add 10.1.101.2/30
no shut
int lo 0
ip add 2.2.2.2/32
no shut
end
copy run start
———————————————————-
Step 2- Underlay- OSPF and Multicast
———————————————————
————-SPINE1———————————–
config t
feature ospf
feature pim
feature bgp
router ospf 1
router-id 100.100.100.100
interface Ethernet1/1-3
ip ospf network point-to-point
ip router ospf 1 area 0.0.0.0
ip pim sparse-mode
interface loopback0
ip ospf network point-to-point
ip router ospf 1 area 0.0.0.0
ip pim sparse-mode
end
copy run start
————-VTEP1—————-
config t
feature ospf
feature pim
feature bgp
router ospf 1
router-id 1.1.1.1
interface loopback0
ip ospf network point-to-point
ip router ospf 1 area 0.0.0.0
ip pim sparse-mode
interface Ethernet1/2
ip ospf network point-to-point
ip router ospf 1 area 0.0.0.0
ip pim sparse-mode
end
copy run start
————-VTEP2——————
config t
feature ospf
feature pim
feature bgp
router ospf 1
router-id 2.2.2.2
interface loopback0
ip ospf network point-to-point
ip router ospf 1 area 0.0.0.0
ip pim sparse-mode
interface Ethernet1/3
ip ospf network point-to-point
ip router ospf 1 area 0.0.0.0
ip pim sparse-mode
end
copy run start
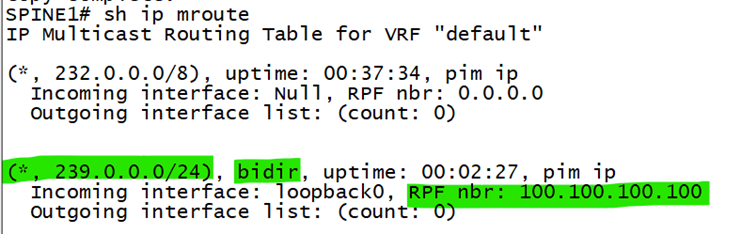
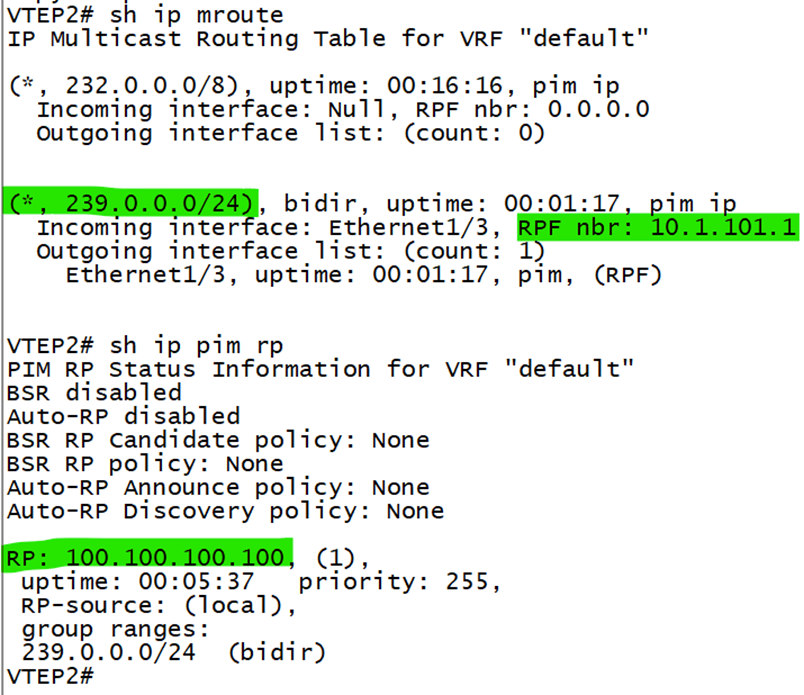
*******Multicast RP on Spine using loopback 0 and put same command on both VTEP’s ***
Config t
ip pim rp-address 100.100.100.100 group-list 239.0.0.0/24 bidir
end
copy run start
Note:
- Loopback on SPINE is needed for multicast Rendezvous point (RP) configuration
- Loopback on LEAF (Or VTEP) is needed for forming VxLAN neighborship with other VTEP’s
——————————————————————————-
Verification- VTEP1, VTEP2 and SPINE1- all interface, ospf, pim and ospf neighborship should be UP!
——————————————————————————-


——————————————————————————-
VxLAN Configuration for Flood and Learn (no BGP required)
**Remember VxLAN related configuration will only go on VTEP’s (Not on SPINE, as SPINE is just a Transport)
——————————————————————————-
VTEP1 and VTEP2
Config t
! For enabling VxLAN
feature nv overlay
! For VNI/VNID
feature vn-segment-vlan-based
! Associate vlan to vni
vlan 100
vn-segment 10100
! Associate vni with multicast group
interface nve1
source-interface loopback0
member vni 10100
mcast-group 239.0.0.100
no shutdown
end
copy run start
Downstream port configuration for Host End device
VTEP1
Note- You need a Layer 3 interface for testing and initiating the VxLAN traffic
Make VTEP your root switch if it is not for your vlan 100- show span vlan 100
config t
spanning-tree vlan 100 priority 4096
end
config t
interface Ethernet1/8 (1/7)
switchport
switchport mode trunk
switchport trunk allowed vlan 100
no shut
end
copy run start
VTEP2
config t
interface Ethernet1/8
switchport
switchport mode trunk
switchport trunk allowed vlan 100
no shut
end
copy run start
End host device configuration
Note:
- You need a Layer 3 interface for testing and initiating the VxLAN traffic as we are using SW images here
- You also need to put a static default route to point next hop as VTEP address as we are using SW images here
HOSTA
config t
host HOSTA
no cdp advertise-v2
Vlan 100
interface e0/0
sw
sw trunk encapsulation dot1q
sw mode trunk
sw trunk allowed vlan 100
no shut
!
interface vlan 100
ip add 192.168.100.10 255.255.255.0
no shut
end
wr
HOSTC
config t
host HOSTC
no cdp advertise-v2
Vlan 100
interface e0/0
sw
sw trunk encapsulation dot1q
sw mode trunk
sw trunk allowed vlan 100
no shut
!
interface vlan 100
ip add 192.168.100.20 255.255.255.0
no shut
end
wr
Commands-
sh nve interface
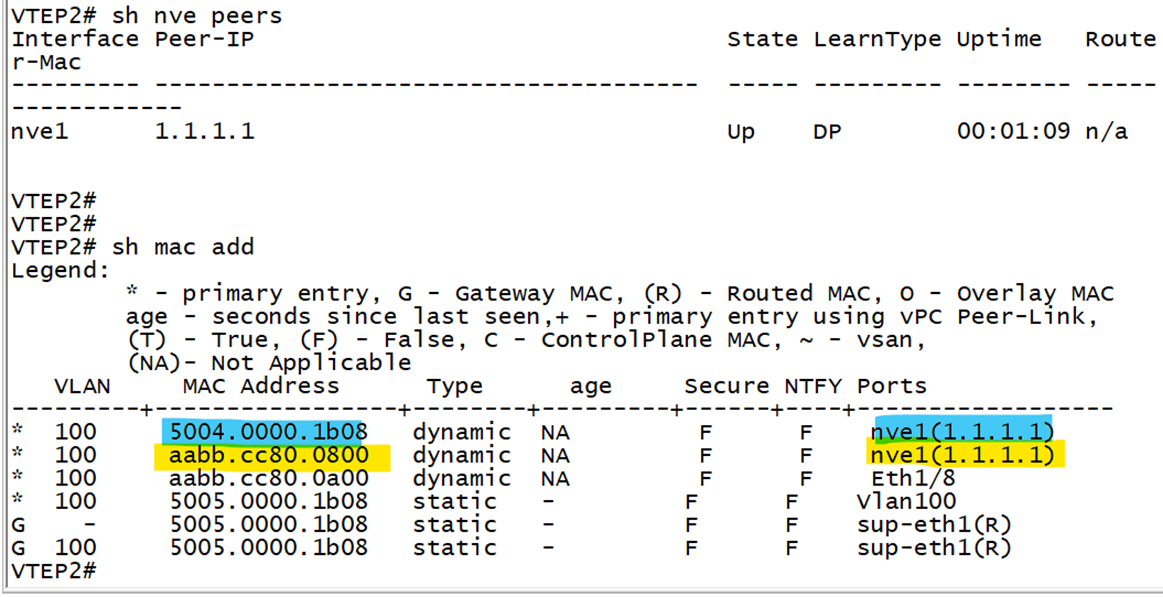
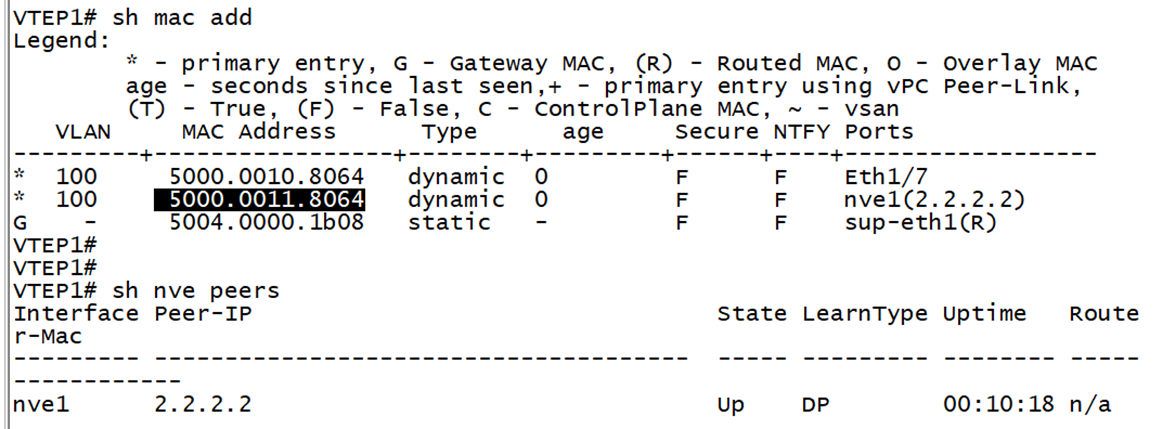
sh nve peers
sh nve vni
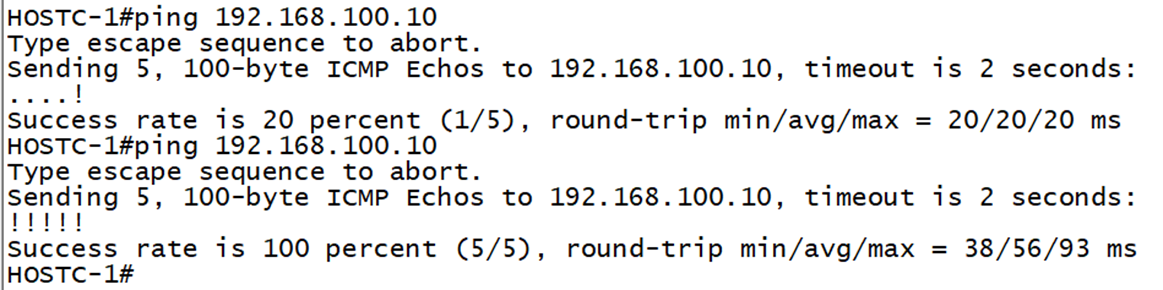
Verification:-
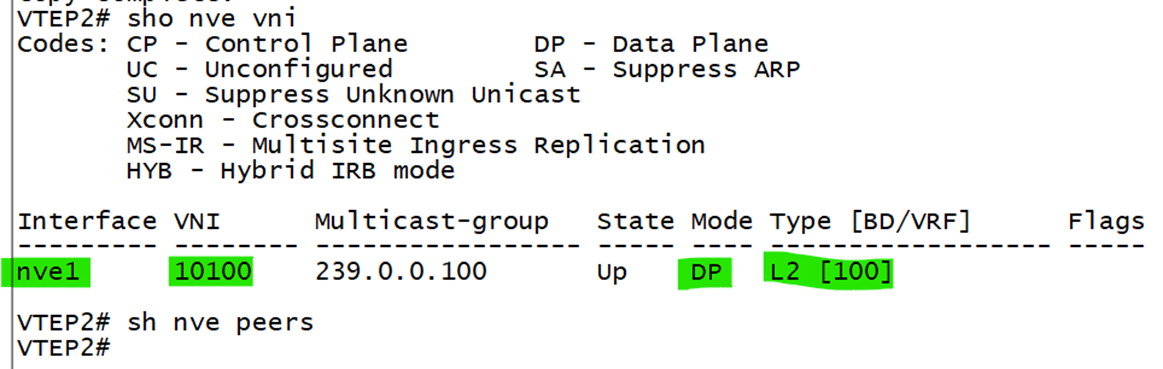
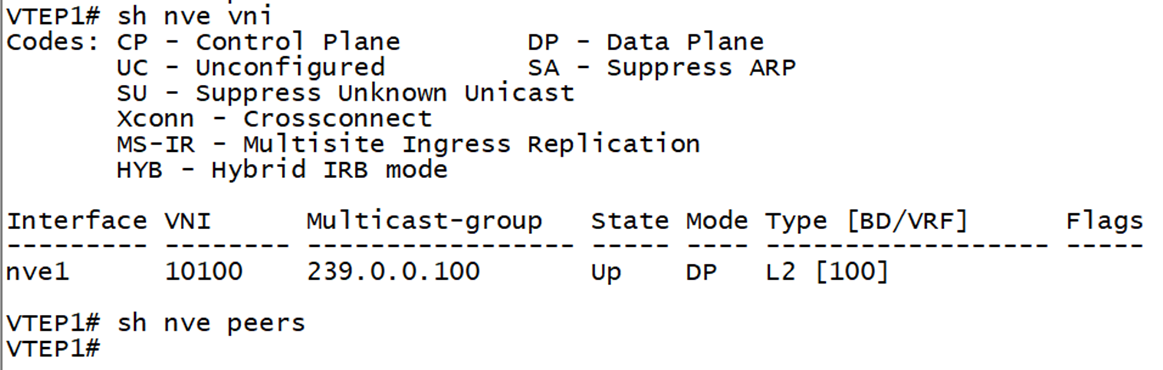
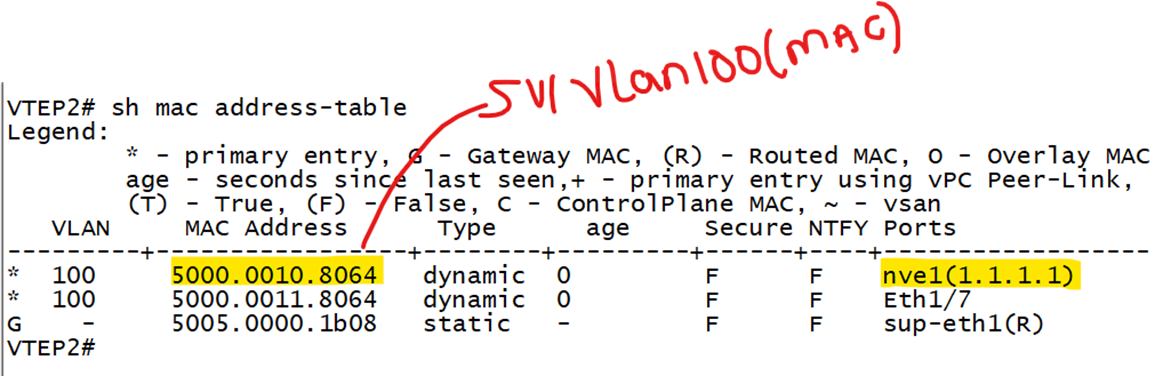
You will not see any peers until there is traffic originated from End host, that the main issues with Flood and Learn, until data plane traffic is initiated, VTEP’s don’t establish peering and learn mac address, noticed in F&L there is no control plane protocol (like BGP) that is running, so after Data plane traffic, control plane functionality is happening, which is peering and mac address learning.
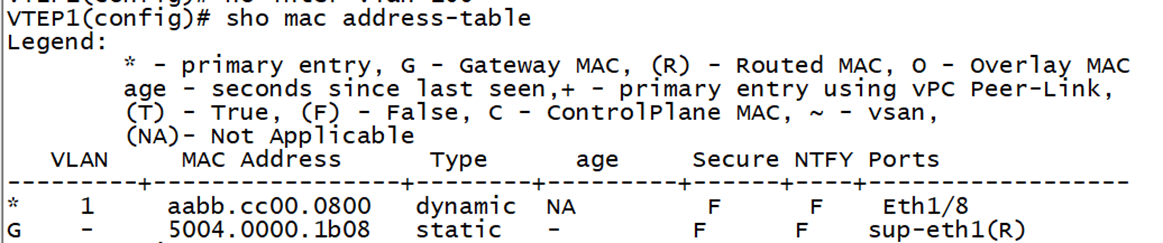
You will only see locally connected host on port 1/8, you are NOT Learning REMOTE VTEP or REMOTE End Host MAC yet!


Issues encountered-
Issues 1- Booting for 1st time or after reboot, you may get into boot loader> prompt,
For Loader prompt, use below command to boot
Loader > boot nxos.9.3.13.bin
To fix it permanently, use below command-– working image-cisco Nexus9000 C9500v Chassis- nxos.9.3.13.bin
config t
boot nxos bootflash:/nxos.9.3.13.bin
Performing image verification and compatibility check, please wait….
copy running-config startup-config
Issues 2- Ran into issue after reboot of VTEP-
VTEP2# show spanning-tree
No spanning tree instance exists.
if you see this, simply shut/no shut the interface, same for your SVI interface, troubleshoot spanning tree 1st, without that data traffic is not going to work, to enable SPT command is – spanning tree vlan 100
Do basic check as well- show ip int bri, show int status, show spanning tree, show int trunk etc
Issues 3- I tried multiple image for NXOSV both in 9.x train and 10.x train but somehow none work for Flood and Learn, expect this image 9.3.13, ensure you use 95v image (correct image- nexus9500v.9.3.13.qcow2) and not 93v image (nexus9300v.9.3.13.qcow2)
Tip- EVE-PRO
clear browsing cache and history if your Wireshark is having issue to capture packet in eve-ng pro for saving capture, use this location –/nobody/thinclient_drives/GUACFS/Download and this will give you option to save on your local PC location (like download folder), this applies only if you are using Native console to log on to eve-ng (not HTML 5), look at page 206, eve-ng professional cookbook
Hope this post is helpful to do understand the details of Flood and Learn VxLAN deployment, in next post I will cover VxLAN EVPN deployment lab.
Thanks
Gary Triv
Leave a Reply